The ticket said “site is slow, nothing changed.” Load average was climbing, PHP-FPM workers were all busy, and the access log showed the same handful of URLs being hit over and over: search queries with random terms, paginated archives forty pages deep, and a slow crawl through every tag page on the site. Nothing was down. Everything was just late.
The fix looked obvious. Drop in a limit_req_zone, apply it, reload, done. Except the reload changed nothing at all, and the reason took an embarrassingly long time to find.
This post covers Nginx rate limiting and bot mitigation the way it actually behaves in front of a real site: how the limiting modules key requests, what burst and nodelay really do to your traffic shape, why a limit that looks correct in the config can be doing nothing (or throttling everyone at once), and how to layer bot handling so you are not playing whack-a-mole with user agent strings forever.
The failure that hides: your limit is keyed on the wrong address
This is the one that bites hardest, because the config parses, nginx -t passes, and the error log stays quiet. Nothing tells you it is wrong.
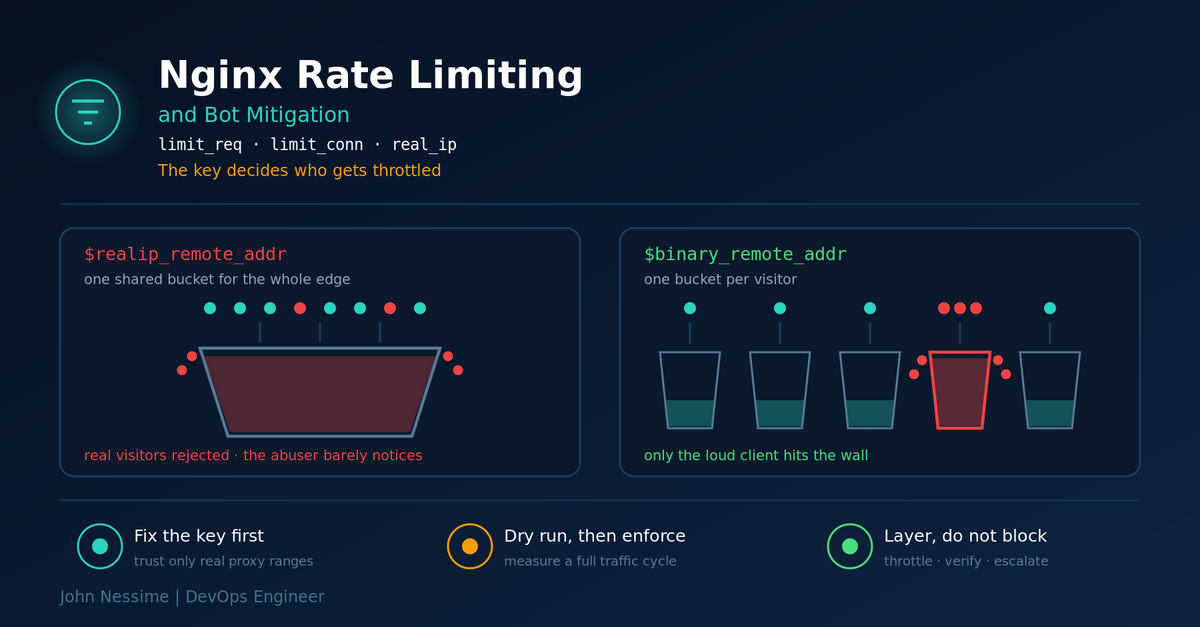
If anything sits in front of Nginx (Cloudflare, another CDN, a load balancer, or a local Varnish tier), then $remote_addr is the address of that proxy, not the visitor. Key a rate limit on it and you get one of two outcomes, both bad:
- Every visitor arriving through a given edge node shares a single bucket. One aggressive client burns the budget and legitimate users start collecting 503s.
- Or your rate is generous enough that the shared bucket never fills, in which case the limit is decorative and the abusive client sails straight through.
The real IP module fixes this, but only if you trust the right sources. It rewrites $remote_addr and $binary_remote_addr from a header, and only for connections coming from addresses you have explicitly declared trustworthy.
# http context. One entry per CDN range you actually receive traffic from.
set_real_ip_from 203.0.113.0/24;
set_real_ip_from 2001:db8::/32;

real_ip_header CF-Connecting-IP;   # or X-Forwarded-For for a generic proxy
real_ip_recursive on;
Two things matter here more than the syntax.
First, never widen set_real_ip_from to 0.0.0.0/0. That tells Nginx to believe a client-supplied header from anyone, which means an attacker can pick a new “client IP” on every request and your per-IP limit becomes unlimited. It also poisons your logs, your deny rules and anything downstream that trusts the forwarded address.
Second, after the real IP module has run, $binary_remote_addr holds the visitor address and $realip_remote_addr holds the original connecting address (the proxy). Key your limits on $binary_remote_addr. Keying on $realip_remote_addr puts you right back in the shared-bucket failure, silently.
The proxy ranges change over time, so treat the trust list as a file that gets regenerated on a schedule and reloaded, not something you paste in once. On a self-managed VPS from a provider like Contabo or InterServer, a small cron job that fetches the current ranges, rewrites an include file, runs nginx -t, and only reloads on success is about twenty lines of shell and saves you from a very confusing afternoon later.
What limit_req actually does, and what burst really means
Nginx rate limiting for requests uses a leaky bucket. The zone stores, per key, the current number of excessive requests. The rate defines how fast that excess drains. Two directives do the work: limit_req_zone declares the bucket in the http context, limit_req applies it in http, server or location.
http {
    limit_req_zone $binary_remote_addr zone=general:10m rate=10r/s;
    limit_req_zone $binary_remote_addr zone=login:10m   rate=20r/m;

    limit_req_status 429;
    limit_req_log_level warn;
}
The rate is expressed in requests per second (r/s) or requests per minute (r/m). If you want less than one request per second, use r/m. There is no native per-hour or per-day unit in the stock module, which surprises people writing password-reset limits.
burst without nodelay is a queue, not a rejection
This is the second-most common misunderstanding after the keying problem. By default, excessive requests are delayed so that they come out at the configured rate. They are only rejected once the number waiting exceeds burst.
location /search/ {
    limit_req zone=general burst=20;
}
At 10r/s, a client that fires 21 requests at once gets one served immediately, nineteen held and released over roughly two seconds, and the last one rejected. Those nineteen held requests are still open connections on your server. You have not reduced concurrency, you have converted a spike into a slow trickle and paid for it in worker slots and file descriptors.
That is genuinely useful for smoothing traffic to a fragile upstream. It is a bad idea for abuse control, where holding the connection is exactly what the attacker wants.
nodelay, delay, and picking between them
nodelay changes the behaviour to: serve everything in the burst window immediately, reject everything past it. The bucket still drains at the configured rate, so a client that sustains the burst rate will hit the wall and stay there.
location /wp-login.php {
    limit_req zone=login burst=5 nodelay;
    limit_req_status 429;
    # ...fastcgi_pass or proxy_pass here
}
The delay parameter is the middle ground: it sets the point within the burst at which requests start being delayed rather than served immediately. burst=20 delay=10 means the first ten excess requests go straight through, the next ten get queued, and anything beyond is rejected.
How I decide: if a human clicking around your site could plausibly generate the spike, use nodelay or a delay that covers it. A single page load pulling twelve uncached assets through Nginx is one “request” to the user and twelve to the limiter. If the endpoint is machine-facing and expensive (search, export, login, an API write path), tighten the rate, keep the burst small, and use nodelay so rejection is fast and cheap.
Also set limit_req_status 429. The default is 503, which tells clients and monitoring that your server is broken rather than that they are being throttled. 429 is the correct semantic, and well-behaved clients back off on it.
Sizing the zone, and the number most guides get wrong
You will see “10m holds about 160,000 IP addresses” repeated everywhere. That is the 32-bit figure. Nginx documents the stored state for limit_req as 64 bytes on 32-bit platforms and 128 bytes on 64-bit platforms, so one megabyte holds roughly 16 thousand states on 32-bit and roughly 8 thousand on 64-bit. On the 64-bit server you are almost certainly running, a 10m zone is closer to 80,000 states.
This matters because of what happens when the zone fills. Nginx evicts the least recently used state. If it still cannot allocate, the request is terminated with your configured error status. A zone that is constantly thrashing under a distributed crawl will start returning errors for reasons that have nothing to do with the rate you configured. If you are limiting a high-cardinality key, give the zone room.
limit_conn solves a different problem, and you probably need both
limit_req caps how fast requests arrive. It does nothing about a client that opens sixty connections and reads each response one byte at a time. That is a concurrency problem, and it belongs to limit_conn.
http {
    limit_conn_zone $binary_remote_addr zone=perip:10m;
    limit_conn_status 429;
}

server {
    limit_conn perip 20;

    location /downloads/ {
        limit_conn perip 4;
        limit_rate_after 2m;
        limit_rate 512k;
    }
}
Three behaviours worth knowing before you pick a number.
- Not every connection counts. Nginx only counts a connection once the full request header has been read and the request is being processed. A client stalling mid-header is not counted here, which is why
client_header_timeoutandclient_body_timeoutstill matter. - Under HTTP/2 and HTTP/3, each concurrent request counts as a separate connection. A limit of 4 that felt generous on HTTP/1.1 can break a modern browser loading a page with many assets. This is a very common self-inflicted outage.
- The
limit_connstate is smaller than thelimit_reqstate, so the same zone size holds roughly twice as many entries.
The pairing is the point: limit_req protects against volume, limit_conn protects against occupancy. Rate limiting alone leaves you open to slow-read exhaustion, and connection limiting alone does nothing about a client making one fast request after another on a keepalive connection.
Choosing keys: IP is a starting point, not the answer
The key can be any variable or combination of variables. That flexibility is where most of the value is, because per-IP limits have a real accuracy problem in both directions.
On one side, carrier-grade NAT, corporate egress, university networks and shared VPN exit nodes (NordVPN, Surfshark and every other provider works this way) put many genuine users behind one address. A tight per-IP limit will hit them. On the other side, a distributed scraper renting a few hundred cheap addresses never touches a per-IP limit at all, because no single address is doing much.
So layer keys instead of tuning one harder:
limit_req_zone $binary_remote_addr zone=perip:20m    rate=10r/s;
limit_req_zone $server_name        zone=persite:1m   rate=200r/s;
Applied together, the per-IP zone catches the loud individual and the per-site zone caps total damage regardless of how many addresses are involved. When several limit_req directives match, all of them are evaluated and the most restrictive result wins. If any one of them rejects, the request is rejected.
One inheritance rule catches people out: limit_req directives are inherited from the enclosing level only if the current level defines none. Add a single limit_req inside a location and you have dropped every limit set at server level for that location. If you want both, restate both.
Allowlisting with an empty key
Requests whose key evaluates to an empty string are not accounted at all. That is the clean way to exempt monitoring probes, your office, or a payment webhook source without maintaining a parallel set of locations.
geo $limit {
    default        1;
    10.0.0.0/8     0;
    192.0.2.10/32  0;
}

map $limit $limit_key {
    0 "";                    # empty key, never limited
    1 $binary_remote_addr;
}

limit_req_zone $limit_key zone=perip:20m rate=10r/s;
Nginx evaluates map variables only when they are used, so declaring a large map costs nothing on requests that never reference it.
Roll it out in dry run, not in production
Both modules have a dry run mode. Excessive requests are counted in the shared memory zone and logged exactly as they would be, but nothing is actually rejected or delayed. Combined with the status variables, this gives you a real answer to “would this limit have hurt anyone” before you find out from a customer.
log_format ratelimit '$remote_addr $status "$request" '
                     'req=$limit_req_status conn=$limit_conn_status '
                     'ua="$http_user_agent"';

server {
    limit_req_dry_run  on;
    limit_conn_dry_run on;

    access_log /var/log/nginx/ratelimit.log ratelimit;
}
$limit_req_status reports PASSED, DELAYED, REJECTED, DELAYED_DRY_RUN or REJECTED_DRY_RUN. $limit_conn_status reports PASSED, REJECTED or REJECTED_DRY_RUN. A numbered rollout that has never embarrassed me:
- Add the zones and the
limit_reqdirectives with dry run on, plus the log format above. - Run for a full traffic cycle. A week if you have weekly patterns, longer if you have a monthly billing spike.
- Count the would-be rejections by user agent and by address. If real browsers appear, your rate or burst is wrong, not your users.
- Turn dry run off on the least critical location first. Watch 429 rates alongside your normal error budget.
- Only then apply it to login, checkout, or anything that costs you money when it breaks.
Shipping the rate limit log into Loki and graphing it in Grafana makes step three take minutes instead of an evening with awk. Any log platform with decent label cardinality handling works; the point is having rejection counts broken down by zone and user agent, over time, next to your latency graphs.
Bot mitigation in layers, cheapest first
Rate limiting treats all clients the same. Bot mitigation is about deciding that some clients deserve different treatment before the limiter ever sees them. The useful mental model is a set of layers ordered by cost and by how easy each is to defeat.
Layer one: robots.txt, and being honest about what it does
robots.txt is a request, not a control. Crawlers that respect it will honour a Disallow on your search endpoint, your faceted filter URLs and your infinite calendar pages, and that alone removes a surprising amount of load. Crawlers that do not respect it will ignore the file completely, and some will read it specifically to find out where the interesting URLs are.
Use it to shape well-behaved traffic. Never use it as a security boundary. And be careful about blanket disallows on search engines you actually want: deindexing yourself is a much more expensive mistake than a bit of crawler load.
Layer two: user agent classification with map
A map on $http_user_agent is cheap, readable, and easy to revise. It is also trivially spoofable, so treat it as traffic shaping rather than enforcement.
map $http_user_agent $ua_class {
    default          human;
    ""               empty;
    "~*bot|crawler|spider|scrape"  bot;
}

map $ua_class $bot_limit_key {
    bot   $binary_remote_addr;
    empty $binary_remote_addr;
    human "";
}

limit_req_zone $bot_limit_key zone=bots:10m rate=30r/m;
That gives declared bots a much tighter budget than browsers while leaving human traffic on the general limit. An empty user agent is worth its own class: almost nothing legitimate sends one, and it is a reliable signal for cheap scraping tools.
Two cautions. Broad substring matching on bot will catch strings you did not intend, so review a sample of your own logs before deploying the pattern. And blocking rather than throttling is a bigger decision than it looks: if you return 403 to a crawler you actually want, you find out weeks later in your search traffic, not in your error log.
Layer three: verifying bots that claim a name
The interesting case is a request claiming to be a major search crawler. Impersonating one is the standard way to bypass a user agent based allowlist, so a claim needs verification.
The method the search vendors themselves document is a forward-confirmed reverse DNS check: reverse-resolve the client address, confirm the resulting hostname belongs to the vendor’s domain, then forward-resolve that hostname and confirm it returns the original address. An attacker cannot fake this without controlling the vendor’s DNS. Several vendors also publish their crawler IP ranges as machine-readable lists, which avoids the DNS round trip entirely.
Here is the honest limitation: stock Nginx has no directive that does this. There is no built-in reverse DNS verification in the core modules. Your realistic options are a third-party module, doing the verification out of band and feeding the result into a geo block or an included allowlist file, or pushing the decision up to a CDN or WAF layer that already does it. Anyone showing you a pure stock-Nginx config that “verifies Googlebot” is verifying a string, not an identity.
This is also the point where an edge provider earns its keep. Cloudflare, Fastly and similar edge platforms maintain verified bot lists and fingerprinting that no single origin server can reproduce, and they drop the traffic before it costs you a worker. If your bot problem is large and distributed, the edge is the right layer and Nginx is your backstop, not your front line.
Layer four: escalation to the firewall
A client that collects hundreds of 429s and keeps going is not going to stop. Serving it a rejection still costs you a TCP handshake, a TLS negotiation and a log line. At that point the cheapest response is to stop answering at all.
Fail2ban is the usual tool: a filter that matches your rate limit rejections in the Nginx error or access log, an action that inserts a firewall drop, and a ban time long enough to be inconvenient. Two things to get right. Match on a pattern that only fires for real limit rejections, or you will ban yourself during a deploy. And if you are behind a CDN, your firewall sees the CDN address, not the client, so the ban has to be applied at the edge instead. Banning a Cloudflare range at your origin firewall takes your whole site offline, and it is a mistake people make exactly once.
Return code 444 is worth knowing here. It is Nginx-specific and closes the connection without any response, which is cheaper than generating an error page for a client that will never read it.
Troubleshooting Nginx rate limiting
The limit does nothing. Check the key first. Log $binary_remote_addr alongside $realip_remote_addr and confirm they differ in the way you expect. Then check inheritance: a limit_req in the matched location discards the server level ones. Confirm which location actually matched by adding $request_uri and a marker header while testing.
Real users are getting 429 or 503. Turn dry run back on and read the log rather than guessing. Usually it is one of three things: a burst too small for a normal page load’s asset count, a limit_conn value set for HTTP/1.1 assumptions on an HTTP/2 server, or a shared-egress network where many people genuinely share one address.
Nothing appears in the error log. The default log level for rate limit refusals is error, and delays are logged one level below whatever you set. If you set limit_req_log_level warn, delays go to info, which your log level may be filtering out entirely. Grep for the limiting messages directly:
grep 'limiting requests' /var/log/nginx/error.log | tail -50
grep 'limiting connections' /var/log/nginx/error.log | tail -50
Intermittent errors under heavy load with no matching rate. Suspect zone exhaustion. Enlarge the zone and see whether the pattern changes. High-cardinality keys and distributed crawls are the usual cause.
Health checks and uptime probes are being throttled. Add them to the allowlist map. Monitoring hitting a rate limit produces alerts about an outage that is not happening, which is worse than no monitoring.
Common mistakes
- Trusting forwarded headers from every source, which turns a per-IP limit into no limit at all.
- Leaving
limit_req_statusat the default 503, so throttling looks like an outage in your own monitoring. - Using
burstwithoutnodelayon an abuse path, and quietly filling worker slots with held connections. - Setting a
limit_connvalue based on HTTP/1.1 intuition on a server serving HTTP/2 or HTTP/3. - Adding one
limit_reqin a location and silently dropping every server-level limit for that path. - Blocking user agent substrings without checking a sample of real logs first.
- Applying identical limits to reads and writes. A cacheable GET and a POST that writes to the database do not deserve the same budget.
- Banning CDN address ranges at the origin firewall because the logs show them as the client.
Best practices worth the effort
- Verify the key before tuning the rate. Every other decision depends on it being correct.
- Always start in dry run and measure a full traffic cycle before enforcing.
- Use separate zones per traffic class. Search, login, API, static and general traffic have different shapes and should not share a bucket.
- Pair
limit_reqwithlimit_conn. The first caps arrival rate, the second caps occupancy, and neither substitutes for the other. - Layer a per-server zone above your per-IP zone so distributed traffic still hits a ceiling.
- Allowlist with an empty key rather than duplicating location blocks.
- Export
$limit_req_statusto your log platform and graph rejections next to latency and upstream errors. - Keep CDN trust ranges in a generated include file that is refreshed on a schedule and validated with
nginx -tbefore reload. - Throttle before you block. Blocking failures are invisible until they show up in your search traffic.
Frequently asked questions
Does Nginx rate limiting stop a DDoS attack?
It helps with application-layer floods that reach your server, because rejecting a request is far cheaper than processing it. It does nothing about volumetric attacks that saturate your network link, since that traffic never gets to Nginx to be limited. For that you need capacity in front of the origin: a CDN or scrubbing service. Treat rate limiting as protection against abuse and accidental floods, not as DDoS mitigation.
What rate should I actually set?
There is no universal number, and any guide that gives you one has not seen your traffic. Measure instead: run dry run mode, look at your real per-IP request distribution, and set the rate above the busiest legitimate client with headroom. Then set a separate, much tighter zone for the specific endpoints that are expensive or attacked.
Should I use 429 or 503 for rejected requests?
429 in nearly every case. It communicates that the client should slow down, well-behaved clients back off on it, and it keeps your 5xx metrics meaningful. The default is 503 purely for historical reasons.
Can Nginx rate limit per hour or per day?
Not with the stock module. It accepts requests per second and requests per minute only, so the slowest native rate is one request per minute expressed as 1r/m. Longer windows need a third-party module, a shared store such as Redis via a scripting module, or enforcement in the application itself. For something like a password reset limit, the application is usually the better place anyway, because it can key on the account rather than the address.
Do rate limit zones work across multiple Nginx servers?
Not in the open source build. Each instance keeps its own shared memory zone, so a client spread across four load-balanced servers effectively gets four times the budget. The sync parameter on limit_req_zone synchronises state across a cluster, but it is part of the commercial subscription. Without it, either divide your intended rate by your instance count, ensure your balancer pins clients consistently, or move the limit to a shared store.
Will blocking AI crawlers hurt my SEO?
Blocking training crawlers is separate from blocking search indexing crawlers, and the distinction is worth checking per vendor before you write a rule, because some vendors run several crawlers with different purposes under related names. The risk is collateral damage: a broad user agent pattern that also matches a search crawler will remove you from results, and you will not notice quickly. Verify your pattern against real log samples, and prefer throttling over outright blocking while you are unsure.
Where should rate limiting live: the CDN, Nginx, or the application?
All three, doing different jobs. The CDN handles volume and known-bad reputation before it costs you anything. Nginx handles per-client shaping and protects your workers from anything that gets through. The application handles limits that need identity or business context, like per-account quotas, which Nginx cannot see. Skipping the Nginx layer because you have a CDN leaves you exposed the moment someone finds your origin address.
The one thing worth remembering
Nginx rate limiting is not hard to configure. It is easy to configure into a state where it silently does nothing, or silently punishes the wrong people, and both failures look identical from the outside: a config that parses, a clean nginx -t, and no complaints until there are.
So get the key right, prove it with a log line rather than assuming it, and run every new limit in dry run until the data tells you it is safe. Layer bot handling by cost, throttle before you block, and be honest about which layer can actually verify an identity. Everything else is tuning, and tuning is easy once the foundation is not lying to you.
Need a second pair of eyes on your Nginx edge?
Most of the work here is diagnostic rather than clever. Things I regularly help with:
- Auditing an existing
limit_reqandlimit_connsetup to find out whether it is actually limiting anything, including the keying and inheritance traps above. - Fixing real client IP handling behind Cloudflare or another CDN, with a generated trust list that refreshes safely instead of drifting.
- Designing per-endpoint zones for WordPress, WooCommerce or API origins so login, search and write paths get budgets that match their real cost.
- Running a measured dry run rollout and reporting back what would have been rejected, broken down by user agent and network, before anything is enforced.
- Building bot classification and escalation: user agent maps, allowlists, Fail2ban integration, and knowing which decisions belong at the edge instead.
- Wiring rate limit telemetry into Grafana and Loki so throttling is something you can see on a dashboard rather than discover from a ticket.
If you would like a look at yours, send me the relevant server block, a sample of the access log, and whatever is currently going wrong. That is usually enough to say something useful straight away.